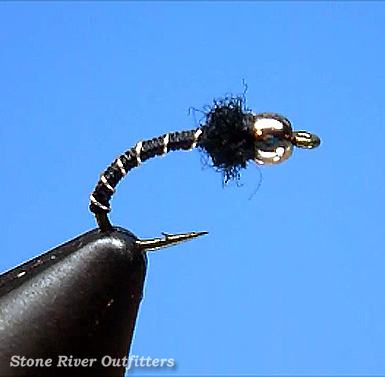
The Beadhead Zebra Midge
An exceptionally simple yet deadly little Chironomid imitation that, despite its diminutively small size, has proven extraordinarilly effective on BIG trout indeed, the Beadhead Zebra Midge is both incredibly easy to tie, and can be easily adapted at the vice to almost any color combination necessary to match your locally specific hatch. A wise choice on tailwaters and spring fed fisheries both Eastern and Western alike, here's how we tie the Beadhead Zebra Midge.
Recipe / Materials List
- Hook: Tiemco TMC 2488 Size 18 (or similar)
- Bead: 5/64 inch Silver Cyclops Eye Bead
- Thread: Black Danville's 6/0 Fly Master (or color of choice)
- Rib: Extra-Small Silver UTC Ultra-Wire
- Thorax: Fine Black Dubbing (or color of choice)

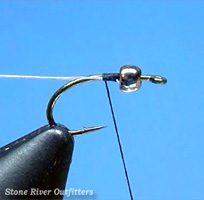 Step 1: We'll start by attaching our tying thread comfortably behind the bead head using a standard jam knot. Once secured, and with our thread's tag end neatly trimmed away, we'll then tie in immediately behind our bead, a nice long working length of silver XS ultra wire.
 Step 2: Next, we'll then bind our wire rearwards towards the hook bend using nice, smooth, close-laid thread wraps, ensuring as we go to work our thread continuously backwards along the shank in smooth careful fashion, until we've at last reached a comfortable stopping point like shown, located deep into the hook's curved bend!
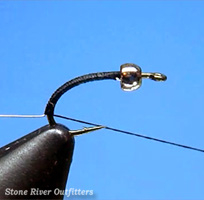
 Step 3: We'll next begin wrapping our tying thread forward again towards our bead, employing as we did before, a continuous series of smooth, carefully controlled, close wound turns; creating as we go a handsome level-laying double-layered body of thread.
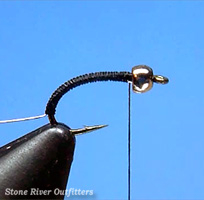
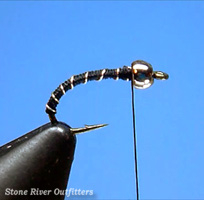 Step 4: Once satisfied with our fly's thread body, we'll next begin advancing our silver wire rib forwards towards our bead, ensuring as we wrap that we use steeply angled, carefully controlled, evenly spaced turns. Naturally, once we've reached our stopping point located just behind the bead, we'll then tie off our wire with a few snug thread wraps, and we'll rid ourselves of the excess wire closely at its base with a quick couple of twists, or a close careful snip.
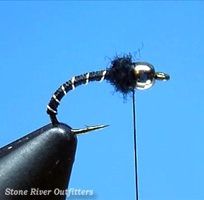 Step 5: To create the Zebra Midge's shouldered thorax, we will next roll a small sparse pinch of fine velvety dubbing neatly around our tying thread, and we'll then wind into place immediately behind our bead, a nice tight round-shaped dubbing ball.
 Step 6: Once happy with our dubbed thorax, we'll end the fly by installing a well-placed whip knot neatly behind our bead. Of course once snugly secured, we'll then trim away our excess tying thread cleanly at its base with a quick close snip of our scissors, and finish the fly with a small drop of fine head cement placed carefully over our whipped wraps.
Summary / Closing Remarks: Well friends, there we have it! A simple yet deadly little chironomid imitation that can easily be adapted at the vise in both size and color to match your local hatches with remarkable success, the Beadhead Zebra Midge works especially well when trailed in dropper fashion behind a larger heavier nymph, or a bushy high floating dry fly as well. Dynamite for fooling BIG tailwater and springcreek trout alike, if either are on your horizon for the season ahead, a healthy batch of Beadhead Zebra Midges will prove a wise addition to your fly box indeed! As always, have fun with this one gang. Thanks so much for all your support, and please don't hesitate to call on us if we can be of further assistance! Sincerely - Nate Harris