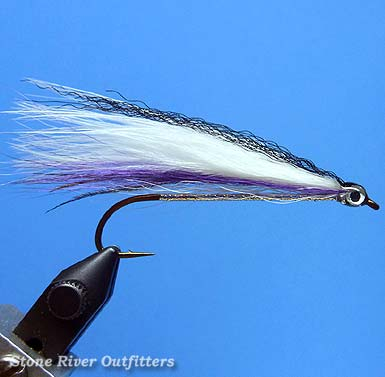
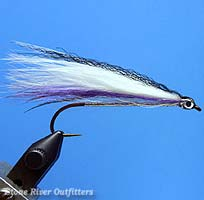
The Winnipesaukee Smelt
First tied over a half century ago by Wolfeboro, New Hampshire's Mr. Jim Warner, the Winnipesaukee Smelt remains a consistent producer season after season throughout our region's many lakes and rivers for both trophy trout and landlocked salmon alike. Deadly whether slowly trolled at depth or cast then rapidly stripped, Jim's novel original has been borrowed and adapted over the years by many, ourselves included, each tweaking Jim's authentic dressing ever so slightly to satisfy personal asethetic or individually specific use. Our own modernized adaptation of the infamous original, here's an easy-to-tie version of Warner's wonderful Winni Smelt that we've enjoyed great success with!
Recipe / Materials List
- Hook: 6xl - 9xl Streamer (like Mustad's L87-3665A)
- Thread: Black Danville's 6/0 Flymaster
- Body: Flat Silver Tinsel (Danville's Silver/Gold Mylar)
- Under Wing: Sparse White Bucktail
- Mid Wing 1: Peacock Herl (3 to 4 strands)
- Mid Wing 2: Sparse Lavender Bucktail
- Main Wing: White Marabou Blood (Thin Quill)
- *Topping: Black Super-Hair, Fish-Hair, DNA or similar
- *Eyes: 1/8 inch Silver Epoxy Eyes
(*Note: Jim's authentic original calls for a topping of black/blue Silver Pheasant Crest and hand painted Pearl/Black Eyes!)
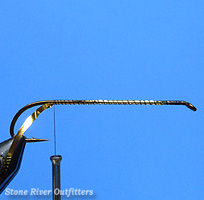 Step 1: Start your tying thread comfortably behind the hook eye using a standard jam knot, then attach your wide Mylar Tinsel with silver side down, gold side facing out. Once secured, bind your tinsel rearward along the hook shank using nice, evenly spaced thread wraps until you've reached a stop postion located just above the hook point, like shown.
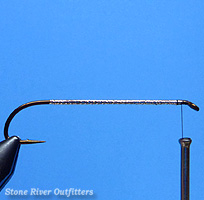 Step 2: Advance your tying thread quickly forward again to a resting position just behind the hook eye, then carefully wrap a smooth, tightly drawn silver tinsel body forward along the hook shank, then snugly tie your mylar tinsel off using a few well placed turns of thread, and trim the excess neatly away.
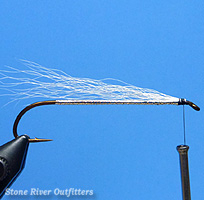 Step 3: Next, to create the streamer's underwing, we'll select and a trim sparse clump of White Bucktail fibers, and with the tips roughly evened, we'll tie the clump securely in place at the fly's head like shown.
***Special Notes: Pay attention to your underwing's length! Your bucktail should extend just slightly beyond, but not too far past the hook bend as shown! Proper proportioning is key, and tying your wings too long will almost certainly cause your fly to foul awkwardly when cast or fished!
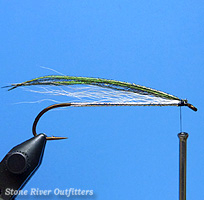 Step 4: To create the streamer's lateral line, we'll next select 3 or 4 finely tapered Peacock Herls, and with the tips roughly evened, we'll tie the herls firmly in place, directly on top and just forward of the white bucktail underwing. Once again, pay careful attention to the length of the peacock herls here too, as we want our fly to swim appropriately once wet!
***Special Notes: While regular old fashioned Strung Peacock will no doubt suffice, I strongly prefer using those finely tapered herls pulled directly from a high-quality, large-eyed Peacock Stick instead!
 Step 5: Next, for the Winni Smelt's midwing, we'll select a sparse, even-tipped clump of Lavender Bucktail fibers, and we'll mount them squarely in place on top of the hook shank using a couple of well-placed, tightly drawn wraps of thread.
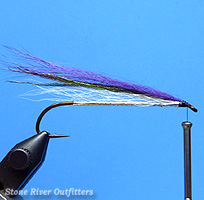
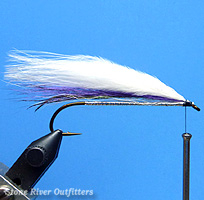 Step 6: For the main wing, we'll select 1 or 2 two premium quality White Marabou Bloods (i.e. plumes with fine, wispy tips and very thin center quills), pair them together evenly if necessary, then we'll tie the marabou firmly in place on the hook shank's top, paying close attention again to the overall length of the wing as it relates to the hook bend!
***Special Notes: For demonstration purposes, I've pictured the absolute maximum length I'm comfortable tying my wings. Make yours any longer, and you're quite likely to experience fouling issues when casting or fishing your finished fly!
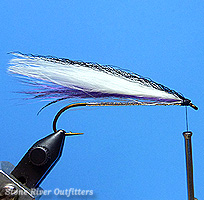 Step 7: To top this streamer, we'll select a sparse length of black synthetic fibers like Unique-Hair (pictured), Fishair or other similarly fine-strand material, and after measuring accordingly, we'll snugly tie our topping in immediately above the white marabou wing with a few tight turns, like shown.
***Special Notes: Jim's original recipe calls for a naturally blackish-blue crest feather drawn from the beautiful Silver Pheasant. A very difficult item to source these days, we've often improvise with more readily available synthetics like those featured above, or perhaps some black dyed golden pheasant crest feathers on occassion too.
 Step 8: To complete the fly, we'll next wrap a neat and tiddy head, whip finish then trim away our excess thread. Once whipped and trimmed, we'll carefully mount a pair of 1/8 inch Epoxy Molded or 1/8 inch Flat Prismatic Stick-On Eyes to the sides of the head, then coat the eyes and thread liberally with clear, glossy high-build lacquer or cement.
***Special Notes: Jim originally painted his eyes by hand, but for sake of speed and convenience, we often prefer employing adhesive backed eyes like those pictured above.
Summary / Closing Remarks: There you have it friends! Another dynamite New Hampshire-born Lakes Region favorite that deserves a spot in every Northeastern trout and landlocked salmon angler's fly box. If you're looking for a fast, fun, and fantastically effective streamer pattern to tie in preparation for the season ahead, try giving this deadly variation of Jim Warner's original Winnipesaukee Smelt a spin! As always, have fun with this one gang. Thanks so very much for all your support. And please don't hesitate to call on us if we can be of further help! Sincerely - Nate Harris