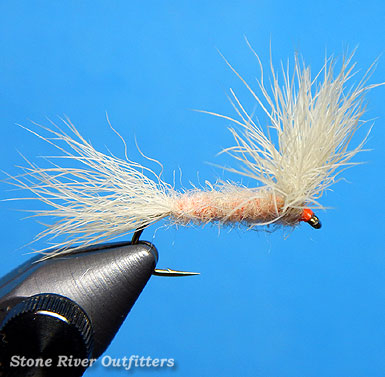
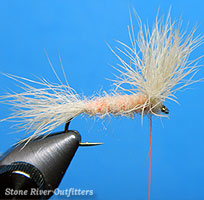
The Usual Dry Fly
Developed by legendary Upstate New York fly tier and fly designer Francis Betters, the Usual Dry is an exceptionally easy pattern to tie, and is incredibly effective at drawing trout to the surface when fished too. A simplified spinoff of his original Haystack dry fly design, Fran's Usual uses only one material in its construction - the coarse, translucent, naturally buoyant hair drawn from the paw pad area of a snowshoe rabbit's foot. A perennial favorite here in the New England that's sure to work wherever fast flowing waters and eagerly rising trout are found, here's how we tie the Usual Dry.
Recipe / Materials List
- Hook: Standard Dry Fly Sizes 10-14
- Thread: Danville's 6/0 Fly Master (Fl Orange or Fl Pink)
- Wing: Snowshoe Rabbit Foot
- Tail: Snowshoe Rabbit Foot
- Body: Snowshoe Rabbit Foot
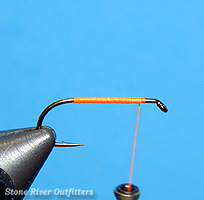 Step 1: Attach your tying thread comfortably behind the hook eye, and wrap a smooth level thread base rearward to a stopping point located just above the hook barb, then forward again as pictured to create the fly's vibrantly colored underbody.
 Step 2: Cut a clump of coarse hair from the paw pad area of your snowshoe rabbit's foot and preen out the fuzzy underfur from the clump's base using your fingers as shown, leaving only the longer fibered guard hairs pinched. This tuft of longer guard hairs will become your fly's wing.
***Special Notes: Do NOT THROW AWAY THE UNDERFUR and errant hairs preened from your wing clump! They will be used later to create your fly's dubbed body.
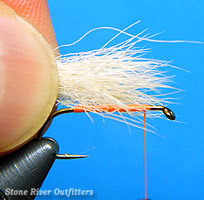 Step 3: With the tapered tips facing forward, quickly measure your wing clump against the hook so that it equals approximately 1 to 1.5 times the length of the hook shank.
 Step 4: With the naturally tapered tips still facing forward over the hook eye, tie the hair clump firmly in place using several tightly drawn thread wraps, then trim the rear-facing butt ends at an slightly pitched angle, like shown. As with the previous step, remember to save these trimmings too, as they'll be needed later to create your fly's dubbed body!
 Step 5: Exploiting the sloping taper created by your angled cut above, smoothly wrap your tying thread rearward towards the hook point binding down the trimmed butt ends of the wing as you go.
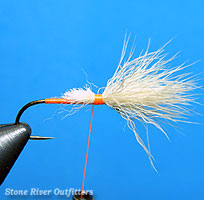
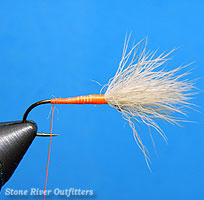
 Step 6: To create the Usual's tail, select another slightly sparser clump of snowshoe rabbit foot hair and preen the bunch with your fingers in the same as done earlier when preparing the wing. Once prepared, briefly measure the clump so that it equals approximately 1 to 1.5 times the length of the hook shank, then firmly tie the tail clump in place with tapered tips facing rearward and trim away the excess butt ends neatly like shown. Once again, do not discard your trimmings!
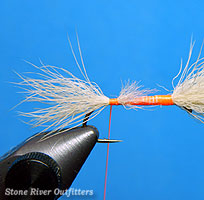
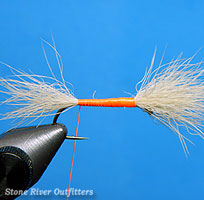 Step 7: Working from tail to wing then wing back to tail, carefully bind down any errant protruding hair butts using a few well placed wraps of thread. Remember, a smoothly tapered, vibrantly colored underbody is your goal.
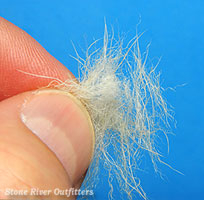 Step 8: Gather up the preened underfur and excess trimmings saved from previous steps and coarsely blend them together by hand to create dubbing for your fly's body.
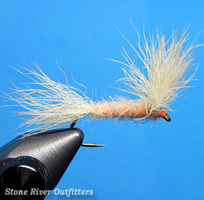
 Step 9: Pinch or roll your hand-blended dubbing around a single strand of tying thread, then wrap forward towards the hook eye to create the Usual's shaggy dubbed body. When you reach wing, gently lift the long hairs upwards using your fingertips and place another two or three dubbed turns in front of the clump's base to help keep your wing propped.
***Special Notes: Snowshoe Rabbit Foot can be frustratingly unruly! A very thin bead of wax applied to your thread before pinching or rolling will no doubt make dubbing this fly's body easier.
 Step 10: Once satisfied with your wing's angle, clean away any excess dubbing from your tying thread, build a small neat head, whip finish, and apply cement.
Summary / Closing Remarks: There you have it friends! Another beautifully simple yet wildly deadly all-purpose-attractor type dry fly pattern that we and many others fish frequently with complete confidence and amazing success, if you've a few spare minutes at the tying vise this winter, we highly recommend giving Fran Betters popular and proven The Usual Dry a try! As always, have fun with this one gang. Thanks so much for all your support, and please don't hesitate to call on us if we can be of further assistance! Sincerely - Nate Harris