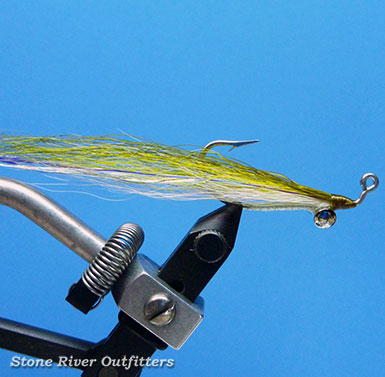
The Improvised Jig Clouser Minnow
A modified adaptation of Bob Clouser's famed saltwater original, the Improvised Jig Minnow has proven my must-have 'go to' fly for targeting Striped Bass, Bluefish, False Albacore and Bonito alike, all along our rich and abundant Northeast seashores. Excellent at imitating slender-bodied baitfish like sandeels, silversides, mummichogs and more, this pattern's innovative use of the uniquely shaped Eagle Claw 413 Jig Hook not only guarantees flies keel correctly (riding hook-point up throughout the retrieve), but dramatically reduces the need for painfully heavy, awkward casting dumbbell eyes too! The first, and often only fly I reach for when heading to the coast, here's how we tie the Improvised Jig Clouser.
Recipe / Materials List
- Hook: #1/0 Eagle Claw 413 Jig Hook
- Thread: White and Olive Danville's 140d Flymaster Plus
- Eyes: Nickel 3/16 inch Dazzl-Eyes (or similar)
- Body: Flat Pearl Bill's Bodi-Braid
- Wing: White, Yellow, and Olive Bucktail
- Flash: Opal Mirage Flashabou (or similar)
- Coating: Devcon 5 Minute Epoxy (or similar)

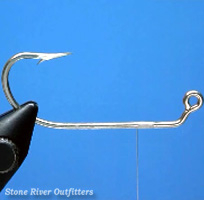 Step 1: We'll start by clamping a #1/0 Eagle Claw 413 Jig Hook in our vise jaws, oriented as it will fish, with the hook point and 60-degree bent up-swept eye leg both facing top. Once firmly positioned, we'll then start our white tying thread, about a 1/4 of an inch behind the eye-leg, like shown.
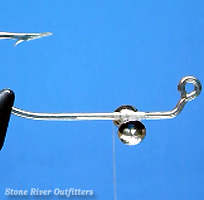 Step 2: Next, we'll mount an hourglass shaped set of Spirit River's 3/16 inch Dazzl-Eyes firmly along the hook shank's belly-side bottom, using a nice tight series of snug-drawn figure-8 thread wraps.
***Special Notes: A quick drop of Zap-A-Gap or deep-penetrating, thin-build head cement to the completed figure-8 thread wraps will prevent our weighted eyes from twisting or turning when fishing, and improve the fly's long lasting durability!
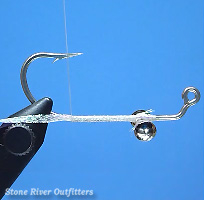 Step 3: Next, we'll tie in a 4 to 5 inch long ribbon of flat Pearl Bill's Bodi-Braid, neatly behind our Dazzl-Eyes, and ounce affixed, we'll then bind the braid smoothly rearward along the shank using evenly spaced turns. We will continue binding rearwards until we've reached an appropriate stop, located about half-way between the hook's sharpened point and hook barb, like shown.
 Step 4: Then, after advancing our thread forward to a resting position located just in front our Dazzl-Eyes, we'll next wind forward our flat pearl braid, creating as we, go a handsome looking baitfish belly.
Once forward towards our head, we'll making a quick figure-8 pass with our braid, over and around our eyes, and once forward of them, we'll then tie off our bodi-braid, and neatly trim away the excess with a quick close snip of our scissors.
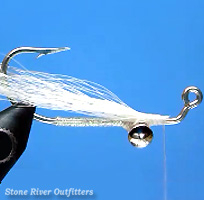 Step 5: To create our underwing, we'll snip a nice, long, notably sparse bunch fine white bucktail fibers, and after a brief course hand-stacking to help even and align the clump's hair tips a bit, we'll then tie our white bunch firmly in place, along the hook shank's top and directly above our Dazzl-Eyes, using few tight wound figure-8 thread wraps.
Once mounted, we'll then bind down, in forward tapered fashion, any front-protruding white hair ends, using a few smooth, well placed thread wraps like shown.
***Special Notes: For proportion's sake, I recommend measuring your white underwing before mounting, ensuring it equals about 2 or so times the total length of your hook shank!
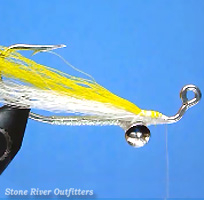 Step 6: To create the Jig Minnow's highlighted mid-wing, we'll next trim from a Yellow-dyed bucktail another a nice, long, notably sparse clump of fine straight hairs. And after another brief hand-stacking to help even up the clump's tips a bit, we'll next tie the yellow mid-wing snugly in place, directly on top and just slightly forward of the white, using a few tight-wound thread wraps.
Once mounted, we'll again bind forward in smooth-tapered fashion, any front protruding hair butt ends.
***Special Notes: As we did before with the white, I strongly recommend proportioning your yellow mid-wing before mounting, so that it roughly measures about 2 or so times the total length of your hook shank as well!
 Step 7: Next, to create ourselves a realistic looking lateral line, we'll carefully tie 3 to 4 lengthy strands of pearly-silver Flashabou, strung neatly along both the near and far sides of our white and yellow bucktail wing.
Once positioned, we'll then install a quick wound whip knot, placed neatly behind our eye leg, and once snugly whipped, we'll then trim away our white tying thread, cleanly at its base, with quick close snip from our scissors like shown.
 Step 8: Next, afer switching out our white tying thread in favor of a fresh new spool of olive, we'll then restart our olive thread by intalling a quick wound jam knot, positioned comfortably in front of our Dazzl-Eyes like shown.
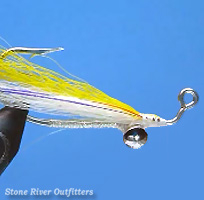
 Step 9: To create the Jig Minnow's dark-toned top-wing, we'll selectively trim and prepare another nice, long, notably sparse clump of Olive-dyed bucktail fibers.
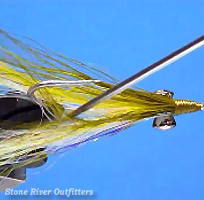
Then, with the clumps fine-tapered tips roughly evened, and the clump briefly measured so that it equals about 3 or so times the total length of our hook shank, we'll next tie our olive top-wing firmly in place, directly above and just slightly forward of the yellow, using few well-placed, tight-drawn thread wraps.
With the top-wing squarely mounted, we'll then carefully build ourselves a nice, smooth, solid-wound, and handsomely tapered head of continuous olive thread.
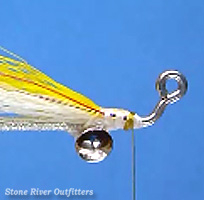
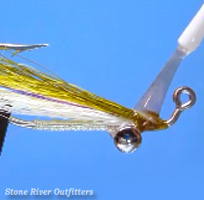
 Step 10: Next, after quickly whip finishing and trimming our olive tying thread neatly away, we'll then take moment to part our bucktail fibers with our bodkin, dividing the wing's hairs neatly and evenly along both the near and far sides of our hook bend like shown.
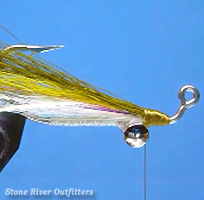
 Step 11: Then, with our bucktail and flash both happily divided, we'll at long last finish this fly by applying a nice liberal bead of clear quick-curing epoxy, or a nice heavy drop of high-quality head cement drug neatly and evenly, with care, around both the entirety of our tapered Olive thread head, and around the edges and base of our machined Dazzl-Eyes as well.
Summary / Closing Remarks: Well friends, there we have it! The Improvised Jig Minnow tied start-to-finish, this lightweight, easy-casting, and true-keeling adaptation of Bob Clouser's infamous original, has fast proven a reliably consistent, and wildly deadly all-purpose, all-seasons, all-species saltwater killer indeed. My personal favorite for fooling big hungry stripers, slammer-sized blues, fast-running false albacore and green-backed bonito alike, if I could only carry a single, solitary fly pattern in my saltwater box to target any and all with equal confidence, the Improvised Jig Minnow would absolutely be it! Have fun with this one gang, and best of luck to you all! Sincerely - Nate Harris