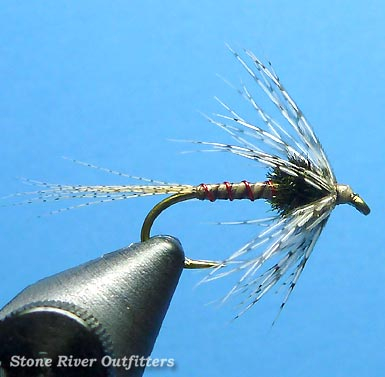
The Hatching Pupa
Originated by local fly fishing and fly tying legend Ellis Hatch, the Hatching Pupa has proven itself among our all-time favorite and most productive wet fly patterns for fooling trout. From Maine to Montana, whether fished alone or tantalizingly strung behind a point fly in dropper fashion, be it in moving rivers and streams or on stillwater lakes and ponds, this spruced up soft hackle just plain hammers fish! Easily adapted at the vise in both color and size to effectively mimic almost any emergent insect imagineable, here's how we tie Ellie's deadly Hatching Pupa.
Recipe / Materials List
- Hook: 1XL to 2XL Nymph/Wet
- Thread: Danville's 6/0 Fly Master
- Tail: Lemon Woodduck Fibers
- Abdomen: Stripped Peacock Eye/Herl
- Rib: Small Red Ultra-Wire
- Thorax: Peacock Herl
- Collar: Natural Hungarian Partridge

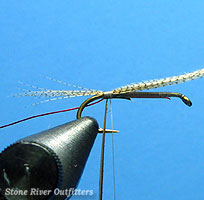
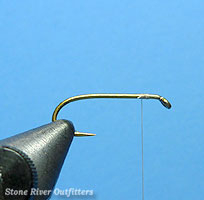 Step 1: Attach your tying thread close to but comfortably behind the hook eye as shown.
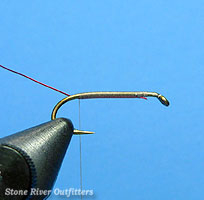 Step 2: Tie in your Ultra Wire on the underside of the hook shank, then carefully wrap a smooth level thread base rearward, simultaneously binding down the wire as you go, stopping just above the hook barb. Be sure to keep the wire rib positioned directly underneath the hook while wrapping!
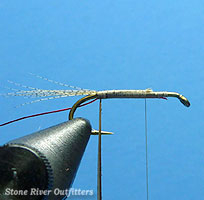
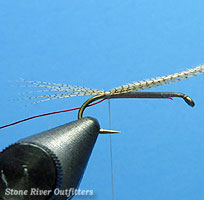 Step 3: Select a well-marked Lemon Woodduck flank and strip 10 or 12 fibers from it for the tail. Measure the fibers so that they're approximately 1.5 times the gape of the hook, then tie them in on top of the hook shank using a couple tight turns of threads being sure to leave the leading ends of the Woodduck fibers intact and untrimmed. Again, do not trim Woodduck butts!
 Step 4: Select a single herl from an eyed peacock stick and carefully strip away the iridescent fuzz using a pencil eraser. Once stripped, tie the naked quill in, tip first, on the underside of the hook shank directly below the tail.
 Step 5: After the rib, tail and quill have been secured, smoothly advance your thread forward along the hook shank simultaneously binding down the untrimmed lemon wood duck fibers as you go until close to, but not crowding the hook eye, as shown. Trim away the remaining wood duck fiber butts closely at their base, then bind down of the cut ends in neat tapered fashion with 2 or 3 more well placed turns of thread.
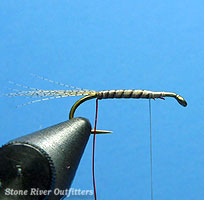 Step 6: Wrap the stripped peacock quill forward in smooth, level fashion to create the abdomen, then carefully tie off and trim.
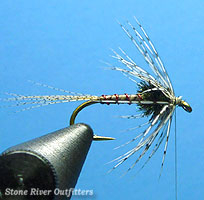
 Step 7: Counter wrap the wire rib forward over the quill body with evenly spaced turns. Once ribbed, carefully tie the wire off and trim away the excess as shown. A quick coat head cement and a pause for drying will not only help bring out extra luster, but will greatly enhance this fly's durability too!
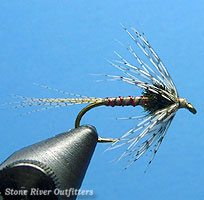
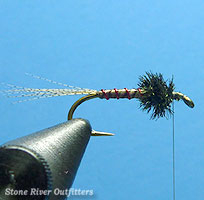 Step 8: Select 4-5 strands of peacock herl, tie them in by their tips, twist for strength, then take 3 to 4 turns with the twisted herl to produce a nice thick thorax. Once satisfied, simply tie off and trim the remaining herl away.
 Step 9: Select a proportionally sized Hungarian Partridge shoulder feather and carefully tie the feather in just in front of the thorax, tip first and curved side down, as shown.
 Step 10: Using your hackle pliers, grasp the feather stem by its butt end and softly stroke the partridge feather's fibers rearward with your offhand gently "pinch folding" the hackle so that they'll behave better when wrapping.
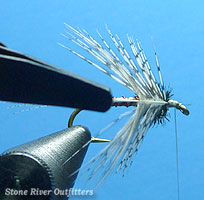
 Step 11: Take two to three of turns with the partridge feather to create the collar, tie off and trim.
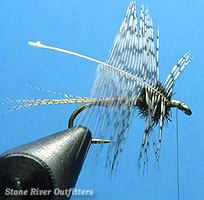
 Step 12: Form a nice neat head, whip finish then trim, and apply cement.
Summary / Closing Remarks: Well friends, there you have it! An absolute killer that's proven its worth season after season on fussy brook, brown, rainbow trout and more. From the east coast to west, there simply is no wrong time, wrong place, or wrong way to fish the Hatching Pupa! An exceptionally versatile, easy-to-tie, and oh so deadly pattern too, if you've not given this signature soft-hackle wet fly adaptation from New Hampshire's own Ellis Hatch a try; trust me, you should! Thanks as always for all of your support, and please don't hesitate to call on us if we can be of further help! Sincerely - Nate Harris