
The Chernobyl Ant
An especially wise choice in summertime and fall, the high-floating all-foam Chernobyl Ant is great for loosely mimicking the season's abundant land-born terrestrials (i.e. grasshoppers, beetles, carpenter ants, crickets and more) upon which panfish, bass, and trout ALL eagerly feed. Equally deadly on both western and eastern waters alike, this highly bouyant dry fly works wonderfully when fished by itself, and makes for a remarkably effective and wildly enticing strike indicator when employed in hopper-dropper fashion as well. A fast, fun, and easy fly to craft yourself, let's give tying the Chernobyl Ant a try.
Recipe / Materials List
- Hook: Favorite 2XL - 3XL Dry Fly (sizes 06 - 10)
- Thread: Danville's 140d Flymaster Plus, Orange (or similar)
- Underbody/Belly: 2mm Thin Fly Foam, Orange
- Upperbody/Back: 2mm Thin Fly Foam, Black
- Legs: Medium Round Rubber Legs, Brown
- Indicator Dot: 2mm Thin Fly Foam, Yellow

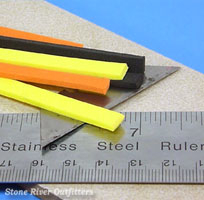 Step 1: We'll begin by first cutting our large flat 2mm sheets of Thin Fly Foam into long slender 'tying-friendly' strips, each measuring about 3/16 to a 1/4 inch in width.
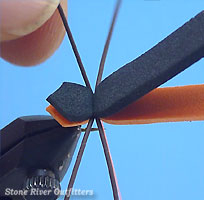
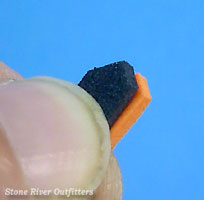 Step 2: With a healthy pile of pre-cut strips now built and set conveniently off to our side, we'll next take in hand together, a Black and Orange length of foam.
With the two pressed neatly together, we will then trim one end of the paired strips, both near-side and far, at an approximate 45-degree angle, creating ourselves a handsomely-pointed, triangular-shaped butt like shown.
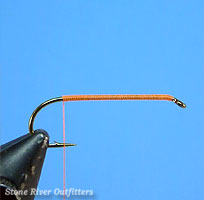 Step 3: We'll next start our thread snugly onto the hook, using a tight-wound jam knot placed just behind our hook eye.
Once secured, we'll then wrap our thread smoothly rearwards, continuing in close-wound fashion along the hook shank's entirety, until we've at last reached a comfortable stop located approximately half-way between the hook's raised barb and sharpened point, as shown.
We're then free to rid ourselves of the thread's excess tag end with a quick firm tug or close careful snip of our scissors.
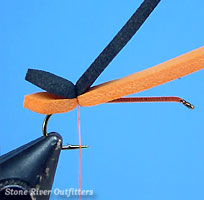 Step 4: Then, with the pointed ends of our paired body strips facing rearward - and the Black positioned purposely over top the Orange - we'll now simultaneously lash both strips together, neatly at the fly's rear, using a few well-placed tight-drawn thread wraps.
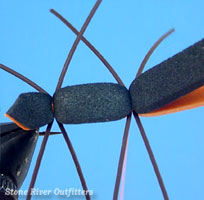
 Step 5: With our Ant's butt now snugly bound and neatly centered, we'll tie firmly into position along both near and far centerline sides of our body, a 2 or 3 inch long pair of Medium Round Rubber Legs.
***Special Notes: Lashing rubber legs and other such materials securely and accurately to hooks need not prove too frustrating! If you're struggling, please be sure to watch this tutorial's accompanying YouTube Video, and see if the simple Thread-n-Bobbin/Pinch-n-Position Method helps ease the task!
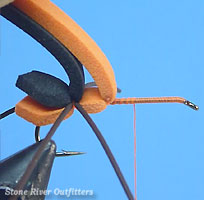 Step 6: Next, to create our Ant's segmented underbody, we'll gently lift and sweep rearward, together, both the Black and Orange foam strips. With both held steadily to the rear by our off hand, we'll then advance our thread smoothly forward along our hook shank, stopping about one-third the distance to our hook eye.
Once there, we'll simply loosen our grasp over the Orange Underbody Strip only, and with the Orange foam pressed flatly along the hook shank's top, we'll then lash the 1st segment securely in place, with a quick couple of well-placed, snug-wound thread wraps.
Once bound, we'll again lift and sweep rearward together both the Black and Orange strips, and we'll advance our tying thread forward along the hook shank again, about the same 'one-third' distance as just wrapped before, to a comfortable resting stop as pictured.
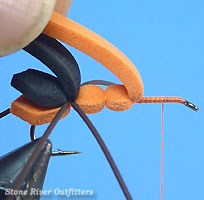 Step 7: After lashing down our 2nd Orange Underbody Segment, we'll again lift and sweep both foam strips rearward, advancing our thread smoothly forward along the hook shank once more, to our 3rd and final segment's stop, located just a short distance behind our hook's down-turned eye like shown.
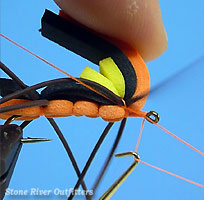
 Step 8: Once there, we'll next press firmly forward, together, both the Black and Orange foam body-strips. With the pair laid flatly across the hook shank's top, we will then lash the two neatly and simultaneously in place, with a quick couple of carefully-wound and notably taught-drawn thread wraps.
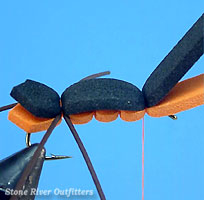
 Step 9: With our segmented underbody and back now well formed, we'll next install our forward set of Medium Round Rubber Legs, in the same manner as we did the rear, ensuring our legs splay neatly along both the Ant's near and far centerline sides.
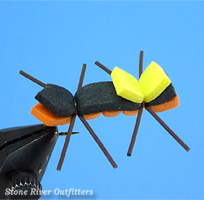
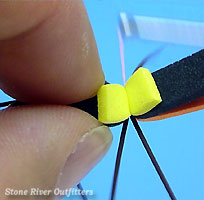 Step 10: Next, to ensure our fly is easily seen while fishing, we'll quickly clip a short 1/4 inch long tab from one of our pre-cut Yellow foam strips. And with the Yellow tab placed neatly atop our Black foam's front (and immediately above where we just lashed legs), we'll then bind our Yellow strike-indicator dot firmly into position with a few more well-placed, tight-wound turns of thread.
 Step 11: With our body, legs, and indicator post all comfortably situated, we'll next pull rearward with our offhand, the forward facing foam strips. With the front end of hook shank now cleanly and conveniently exposed, we'll then install a nice neat whip finish knot positioned just a short distance behind our hook eye, as shown.
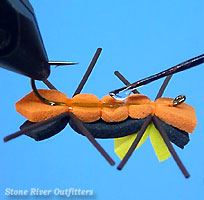
 Step 12: Once snugly whipped, and our excess tying thread trimmed cleanly away, we'll next give our Ant a handsome block-shaped head by simply snipping squarely through, together, both the Black and Orange foam, using a smooth straight-line cut from our scissors, purposefully made just a short distance in front of our hook eye like pictured.
 Step 13: Next, in preparation for the fly's completion, we'll now take a moment (if necessary) to trim back our legs equally and evenly, to our optimally desired fishing length.
***Special Notes: I often skip this step while at the tying bench, choosing to leave my legs longer perhaps than is truly practical or necessary. With fish sometimes seemingly favoring shorter legs over long, and other days proving fonder of long more so than short... I prefer to snip my legs streamside, as conditions command!
 Step 14: With our legs appropriately snipped, and after a final fast re-alignment of our body if needed (the foam strips often shift or roll off-center, especially when tying using heavy-tension), once satisfied with our fly's general appearance, we'll at last end with a heavy dab of high quality head cement or a semi-liberal bead of fast drying Zap-A-Gap drug neatly and evenly along our Ant's exposed belly-side thread-wraps and underbody's entirety.
 Step 15: Remove completed Chernobyl Ant from your vise jaws. Stow the finished Ant securely inside your summertime fly box. Jump back on the vise quickly, and get busy tying your next one!
Summary / Closing Remarks: Well friends, there we have it, the Chernobyl Ant tied start-to-finish! This high-floating all-foam favorite will no doubt prove an exciting and worthwhile addition to your fly arsenal for the coming summer/fall season ahead. Easily adapted at the vise in size and color to whatever preferences a tying angler chooses, and perfect for loosely impersonating those big meaty mouthfuls like grasshoppers, carpenter ants, beetles, crickets and more, upon which panfish, bass, and fat hungry trout ALL gluttonously feed. I hope you'll give tying and fishing the wildly deadly Chernobyl Ant a try. As always, have fun with this one gang! Thanks so very much for your support, and please don't hesitate to call on us if we can prove of further assistance. Sincerely - Nate Harris