
The Simple CDC Caddis
Granted, while this pattern doesn't look like much, the Simple CDC Caddis has proven one of our all-time favorite dry flies for trout. So much so in fact, we literally carry 2 or 3 boxes full of this fly (in various sizes and colors) with us at all times! A deadly pattern that we and many others have fished successfully from Maine to Montana, the Simple CDC Caddis is not only extremely effective, it only takes about 30 seconds to actually tie! Here is how it's done.
Recipe / Materials List
- Hook: Favorite Standard Length Dry Fly (Sizes 12 - 20)
- Thread: 14/0 Gordon Griffith's or similar (color to match body)
- Body: Favorite Fine Dry Fly Dubbing (color to match hatch)
- Wing: 2 Natural Gray CDC Plumes (not Oiler Puffs!)

 Step 1: First attach your thread approximately 1 hook eye length back from the eye of the hook with a traditional jam knot.
 Step 2: Next, take a tiny amount of your favorite black dry fly dubbing and sparsely single-strand dub approximately 2 to 3 inches of your thread.
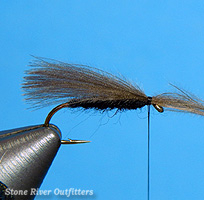
 Step 3: Next, smoothly wrap your dubbed thread rearward to the area of the hook shank located directly above the barb. Once there, reverse direction and wind/dub forward up to your original tie-in point, building a slight taper to the body as you proceed towards the eye.
***Special Notes: Remember! You want a sparse body for this fly. Do not use too much dubbing.
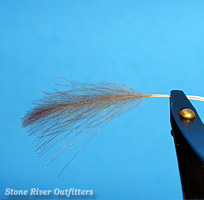 Step 4: Next, select two CDC plumes and positon them opposite of each other, with their concave or cupped sides facing together, and the tips lined up so that they are even.
 Step 5: Next, with your wing formed, lay it directly on top of the hook shank with tips extending approximately an 1/8 inch past the bend of the hook. Once positoned, temporarily tie it in place with a couple loose thread wraps, but do not trim the butt ends yet!
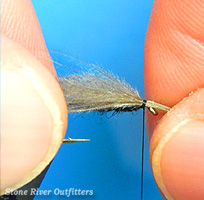 Step 6: Next, carefully grab the tip ends of your wing with one hand, and the stem butt ends with your other, and slowly pull your wing to length by drawing the butts towards the hook eye.
***Special Notes: By tying in the wing slightly longer with a couple loose thread wraps, then drawing it to length towards the eye of the hook, the cupped CDC fibers are forced together helping form a tent-style wing. This tent-style wing will trap more air bubbles, helping the fly will float better.
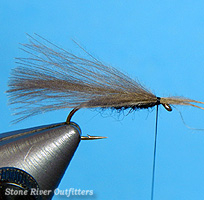
 Step 7: Next, once you are happy with the wing length, lock it in place with several snug wraps of thread and trim off the stem butt ends as close as possible. The wing should look similar to the picture shown.
 Step 8: Lastly, cover up the remaining butt ends of the CDC wing with several nice smooth thread wraps while creating a small head. Once the head is formed to your liking, whip finish, cement, and you're finished!
Summary / Closing Remarks: There you have it folks! Another beautifully simple yet wildly productive fly pattern that can be easily adapted to match almost any local hatch desired, don't be afraid to try changing the colors of the body, the CDC wing, or both! Exceptionally versatile, easy-to-tie, and oh so deadly too, if you've not yet given tying or fishing the 30 second Simple C.D.C. Caddis a try... trust us... you should! As always, have fun with this one friends! Thanks too for all your patronage and support. And please don't hesitate to call on us if we can be of further assistance or help! Sincerely - Nate Harris