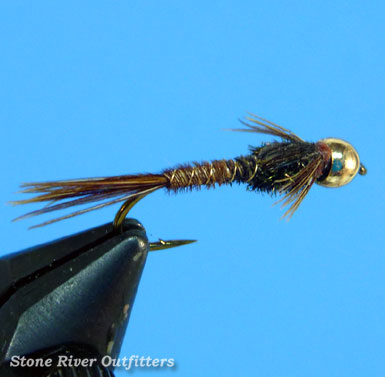
The Beadhead Pheasant Tail Nymph
Indeed one of fly fishing's most versatile and all-around productive subsurface attractor patterns, the Beadhead Pheasant Tail Nymph is great for searching out brook, brown, and rainbow trout alike. A refreshingly simple fly to tie, and one that can be easily adapted at the vise to whatever size or color a tying angler chooses, the extraordinarily deadly Beadhead Pheasant Tail loosely impersonates the many various swimmer, crawler, and clinger-type mayfly nymphs upon which trout in most any healthy river, stream, pond or lake, ALL reliably feed. A tried-and-true favorite you won't want to be without, let's give tying the Beadhead Pheasant Tail Nymph a try.
Recipe / Materials List
- Hook: Favorite 1xl - 2xl Nymph/Wet (sizes 10 - 18)
- Bead: Gold Cyclops Eyes or Tungsten (approriately sized)
- Underbody: Round Lead Wire or Non-Toxic Substitute
- Thread: 6/0 Danville's 70d Flymaster (or similar)
- Tail: Ringneck Pheasant Tail Fibers
- Rib: UTC Ultra-Wire (size/color of choice)
- Abdomen: Ringneck Pheasant Tail Fibers
- Thorax: Peacock Herl (3 or 4 strands, twisted)
- Wingcase: Ringneck Pheasant Tail Fibers
- Legs: Ringneck Pheasant Tail Fibers (tips)

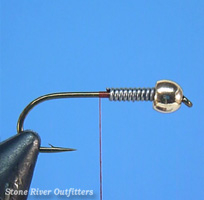 Step 1: To begin, we'll first start by installing an appropriately sized round gold bead smoothly onto, and then all the way forward towards the ringed-eye of our favorite 1X long to 2X long nymph hook. Once installed, we'll then clamp our hook firmly in our vise jaws by its bend like shown.
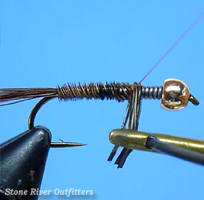
Then, to give our nymph some added weight ensuring it sinks quickly when fished, we'll next add a good 10 to 12 tight-wound, close abutting wraps of soft round lead wire or non-toxic lead-free substitute.
Once wrapped, we'll next push our weighted underbody smoothly forward towards and neatly up into our round Gold Bead's machined counter-sunk rear, and then attach our tying thread snugly onto our hook via a well-placed taught-wound jam-knot positioned just behind our lead wire's rear, as pictured.
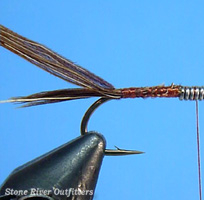
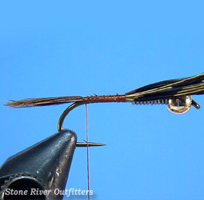 Step 2: Next, after snipping a handsome even-tipped bunch of 6 to 10 notably long and well-marked Ringneck Cock Pheasant tail fibers, we'll then tie the tail fibers (with narrow pointy ends facing rearwards) firmly in place, with a series of taut-wound thread wraps made smoothly rearward along the hook shank, continuing until we've reached a comfortable stop, located just above our hook's raised barb, like shown.
***Special Notes: For proportion's sake, try to ensure your tail extends rearward about the same length as your fly's body (i.e. as measured from bead to bend)!
 Step 3: Next, to enhance our fly's durability, we'll now tie in a comfortable 3 to 4 inch working length of Small Gold UTC Ultra Wire, neatly at our fly's rear, to serve as our rib.
***Special Notes: For a better looking and more evenly tapered abdomen, remember to bind your wire rib smoothly forward along your nymph's underside belly, all the way to your wrapped lead's rear!
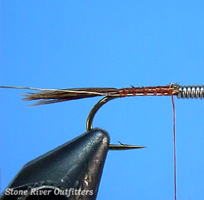
 Step 4: With our rib now snugly bound, we'll next snip from the stem another nice and even-tipped bunch of 6 to 10 notably long, well-marked Ringneck Cock Pheasant tail fibers.
Once snipped, we'll then tie those bundled tail fibers in place, firmly by their tips, neatly at the fly's rear.
Once secured, we'll next advance our thread purposefully forward along our hook shank in smooth-laid taut-wound fashion, continuing until we've reached a comfortable resting stop located like pictured, just a wee bit forward of our lead wrapped underbody's rear.
 Step 5: With our bobbin resting comfortably out of our way, and with the help of good pair of hackle pliers too perhaps, we can now wrap forward our well-marked bundle of pheasant tail body fibers.
Advancing quickly but deliberately forward using smooth, continuous, close-wound turns, we'll continue wrapping our pheasant tail body all the way towards, and then smoothly up and neatly onto our lead wire's rear.
Once there, we'll next tie off the pheasant tail fibers firmly like shown, and naturally once secured, we will then trim away the excess pheasant fiber butts neatly at their base, with a close careful snip of our scissors like shown.
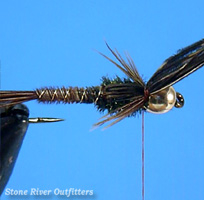
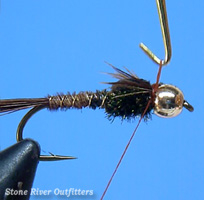
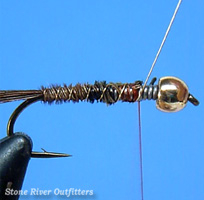 Step 6: With our abdomen built, we'll now begin winding forward in counter-wound fashion (i.e. in the opposite direction as our pheasant tail fibers), our Gold Wire Rib! Advancing smoothly and progressively along the body using steeply-angled and evenly-spaced turns, we'll continue winding our rib all the way forward towards the hook eye, until we've at last reached a comfortable resting-stop located just short distance behind our round gold bead's rear.
Once there, we'll next tie our wire off tightly with a few well-placed thread wraps, and once secured we will then rid ourselves of the excess wire with a couple of quick, vigorous, deliberate, breaking twists.
***Special Notes: To preserve sharpness and ensure your fly tying scissors last for many seasons still to come, try to avoid snipping the wire with your shears. Remember, nothing dulls scissors faster than trimming wire!
 Step 7: With our tail and abdomen well-constructed, we can now begin working on our thorax, wing case, and legs. To do so, we'll first start by wrapping rearwards over-top our exposed lead wire, a smooth level thread-base upon which we can work.
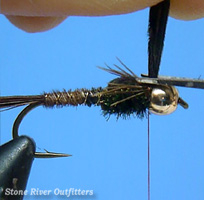
Once laid, we'll again reach for our Ringneck Pheasant Tail feather, and we will selectively snip from its stem another handsome evenly-tipped bunch of 8 to 12 notably long, well-marked fibers.
Then, with the fiber bundle's pointy ends facing front, and with the tapered tips purposely extending about a bead's length or more beyond our hook eye, we'll next go ahead and lash those pheasant tail fibers squarely along the hook shank's top, like shown.
 Step 8: With the basis of our legs and wing case now established, we'll next grab in hand 3 or 4 nice long strands of high quality Peacock Herl.
Then, after a quick flush trim of the herl tips, and with those fresh-cut tip-ends then facing front, we'll next tie our peacock neatly into position, just behind our bead like shown.
***Special Notes: Though by no means necessary, I highly recommend taking a moment before continuing, to prepare an iron-clad and easier-wrapping thorax by quickly reinforcing your notoriously fragile peacock herls, using the simple yet durable 'twisted dubbing loop' method. For a brief overview of how this is done, be sure to check out the video version of this tying tutorial on our Stone River Outfitters YouTube Channel!
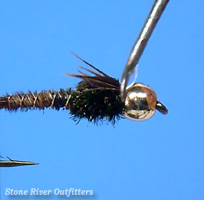
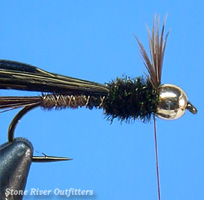 Step 9: We will next wrap our peacock herl smoothly forward to our bead, creating as we go, a nice handsomely plump thorax!
Once wound, we'll then tie off our herls neatly behind our bead, and once snugly secured, we will next gently lift, then carefully trim away the excess remaining peacock, as pictured.
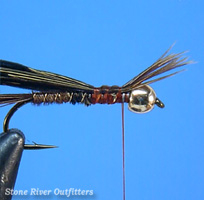
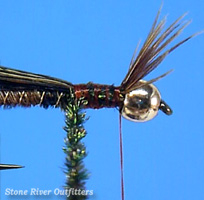
 Step 10: With our thorax built, we'll next quickly part our forward pitched legs neatly and evenly at their middle, and once evenly divided, we'll then pull across the thorax's top, our pheasant tail fiber wing case.
Then, with our parted legs swept neatly to the rear, and our front-drawn pheasant tail fibers pinched firmly forward, we'll next tie our tie wing case off tightly behind our bead like shown, with a quick couple of well-placed, notably snug-drawn turns of thread.
 Step 11: With the wing case and legs now comfortably secured, we're now free to lift then carefully trim away, closely at their base, the forward protruding excess pheasant tail fibers.
 Step 12: Once cleanly trimmed, we'll next install just behind our bead, a nice neat well-placed whip finish.
 Step 13: Once snugly whipped, and with our excess tying thread trimmed closely away, we'll at last end this fly by applying a nice semi-liberal drop of head cement drug neatly and evenly around our whip knot's entirety.
Summary / Closing Remarks: Well friends, there we have it! The Beadhead Pheasant Tail Nymph tied start to finish. This wildly versatile and exceptionally popular all-purpose all-seasons subsurface favorite is a truly a must-have fly pattern for trout indeed. A dynamite choice for effectively mimicking almost any important species of immature mayfly upon which trout all reliably and voraciously feed. If you've not yet given tying and fishing the deadly Beadhead Pheasant Tail Nymph a try, you should! As always, have fun with this one gang. Thanks so much for all your support. And please don't hesitate to call on us if we can be of further assistance! Sincerely - Nate Harris