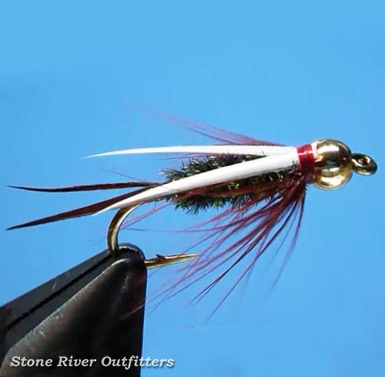
The Beadhead Prince Nymph
Originated in the 1930's by Minnesota brothers Don and Dick Olson, and popularized shortly thereafter by western angler Doug Prince for whom it was subsequently named; the Prince Nymph (a.k.a. the Forked Tail Nymph) has long proven not only one of trout angling's most widely and easily recognized fly patterns, but arguably one the deadliest ever created too! An exceptionally effective and much beloved subsurface favorite, and one that no successful trout angler's fly box should ever be without; let's give tying the modern Beadhead Prince Nymph a try.
Recipe / Materials List
- Hook: 1xl to 2xl Nymph/Wet Sizes 10 - 18
- Bead: Gold Cyclops Eye or Tungsten
- Weight: Round Lead Wire or Lead-Free Sub
- Thread: 6/0 Danville's 70-denier Flymaster (or similar)
- Tail: Brown Stripped Goose Biots
- Rib: Gold Ultra-Wire or Gold Oval Tinsel
- Body: Long Strung Peacock Herl
- Collar: Brown Hen Neck (or similar)
- Wing: White Stripped Goose Biots

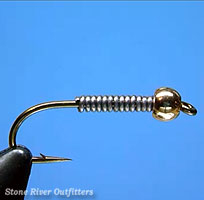 Step 1: We'll begin by mounting an appropriately-sized round gold bead to our hook. Once installed, we'll then wind a dozen or so wraps of round-lead wire (or lead-free substitute) neatly behind our bead like shown.
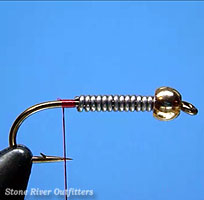 Step 2: With the bead and lead-wire wraps pushed neatly forward towards the hook eye, we'll then start our tying thread by placing a nice, tight-wound jam knot just behind our weighted underbody.
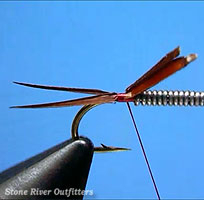 Step 3: Next, to create the Prince Nymph's signature brown forked tail, we'll carefully tie in a handsomely pointed pair of rusty brown dyed goose biots, neatly at the fly's rear.
***Special Notes: For proportion's sake, it helps to pre-measure our goose biots before we tie them in, ensuring our tail equals about 1 or so times the length of our hook shank!
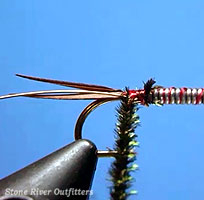 Step 4: With our brown forked tail now neatly positioned, and the forward excess biot ends cleanly trimmed away; we'll next tie in (at the fly's rear) our gold wire rib, followed immediately by 4 or 5 strands of nice long fluffy peacock herl, twisted around our tying thread for enhanced strength!
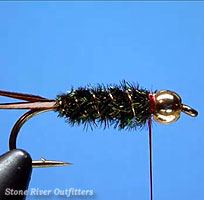 Step 5: Next, to create the Prince Nymph's body, we'll carefully wrap our twisted rope of peacock forward to our bead, where we'll neatly tie off the herls and trim. We'll then wind forward (in counter-wound fashion) our gold wire rib using tight drawn, evenly spaced turns. Once ribbed, we'll then trim or break away the excess wire neatly at the tie-off point.
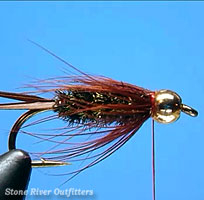 Step 6: Next, to create our collar we'll tie in an appropriately-sized soft webby brown-dyed hen neck feather neatly by its tip, just behind our bead. We'll then take 2 or 3 nice sparse turns with the hackle. Once wound, we'll quickly tie of our brown hen feather using a few well-placed thread wraps, then we'll cleanly trim away the excess forward-protruding stem.
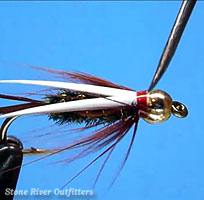
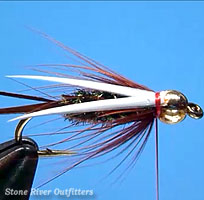 Step 7: To create the Prince Nymph's signature white V-wing, we'll next position a handsomely pointed pair of bright white goose biots neatly atop our fly, and we'll tie them carefully in place, neatly behind our bead using a few well-placed, tightly-drawn turns of thread.
Once tied, we'll then trim away the excess forward-protruding biots end, just forward of our thread wraps like shown, with a quick, careful snip or two of our scissors.
***Special Notes: Again, for proportion's sake, our white goose biot v-wing should ideally measure about 1 or so times the length of our hook shank!
 Step 8: With the white wing securely positioned and the forward-excess biot ends cleanly trimmed, we'll finish the fly by installing a snug whip knot placed just behind our bead. Once whipped, we'll then trim away our tying thread cleanly at its base, and we'll end by applying a small dab of high-quality head cement drawn neatly and evenly around our thread wraps.
Summary / Closing Remarks: Well friends, there we have it! The Beadhead Prince Nymph tied start-to-finish. This simple little fly pattern's seductive combination of peacock herl, paired with its forked brown tail and bright white V-wing have, together, proven far more than most trout can resist. A true all-American favorite that's long earned a reputation for deadly success the whole world over, be sure to give tying the Beadhead Prince Nymph a try! As always, thanks so much for all your support, and please don't hesitate to call on us if we can be of further assistance! Sincerely - Nate Harris