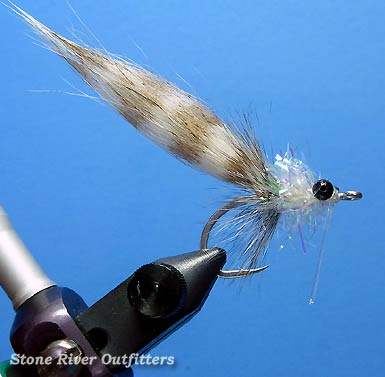
The Arctic Shrimp
A variation of Tim Borski's popular Craft Fur Shrimp, Dan's Arctic Shrimp substitutes Artic Fox Tail hair for the wing instead of synthetic Craft Fur, giving this fly not only better natural taper, but enhanced action in the water as well. A favorite for South West Florida angling that's absolutely deadly for fooling Snook, Redfish, and Seatrout, Dan says 'I'd confidently toss this fly in front of any species of fish that feeds on shrimp. I even had a client fishing in the Keys who managed to catch a quite sizable Sheepshead on it!' A killer down South no doubt, that's also great for fooling Striped Bass locally here along our Northeast seashores too, here's how we tie Dan's Arctic Shrimp.
Recipe / Materials List
- Hook: #02 Gamakatsu SL-12-S (or similar)
- Thread: Danville's 140d Fly Master Plus - White
- Tail: Arctic Fox Tail Medallion - White
- Barring: Copic or Prismatic Marker - Dark Brown
- Collar: Strung Streamer Neck Hackle - Grizzly
- Body: Estaz - Opal White
- Eyes: Bead Chain Eyes - Black 1/8 inch
- Weed Guard: Mason Hard Mono - 16lb or 20lb
- Coating: Devcon 5 Minute Epoxy (or similar)
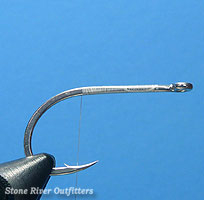 Step 1: Attach your thread comfortably behind the hook eye at a distance similar to that pictured, then wind a smooth and level thread base down the hook shank ending just in front of the hook's barbed point.
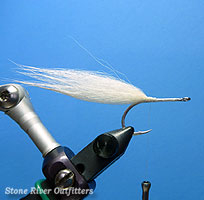 Step 2: Gather a hank of Arctic Fox Tail (about the diameter of a standard #2 pencil) that measures roughly twice the hook's length, trim closely at the base, then tie the clump in securely on the shank positioned directly above the barb. Carefully trim the Fox Tail's butt ends at an angle, tapering nicely towards the hook eye.
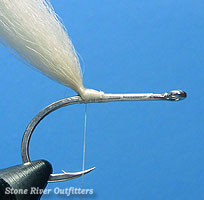 Step 3: Take 3-4 turns with your tying thread around the base of the Fox Tail clump, propping the wing up at about a 45 degree angle, then coat your thread wraps lightly with head cement. An important step, this simple propping technique helps ensure your fly's tail does not wrap or foul when casting and fishing!
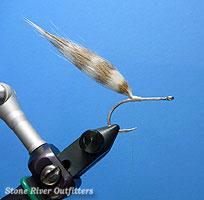 Step 4: Using your permanent marker, add evenly spaced stripes along the length of the wing by gently drawing the marker-tip across both the near and far sides of the Fox Tail.
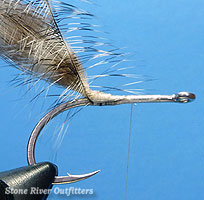 Step 5: Select two slightly oversized Grizzly Strung Streamer Neck Hackles whose barbs ideally measure about 1.5 to 2 times the hook gape. Pair them together in cupped fashion and snugly tie the two in simultaneously, tips first and curved sides down. Once secured and the excess feather tips trimmed away, advance your thread forward to approximately the midway point of the hook shank, as shown.
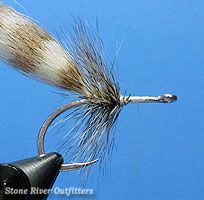 Step 6: Grasping both hackles together firmly by their butts, carefully wrap your hackles forward, with each new wrap made immediately in front of the previous, remembering to gently stroke the feather barbs rearward between each turn. Once you've 4 or 5 turns completed, simply tie off hackles stems cleanly and trim away the excess.
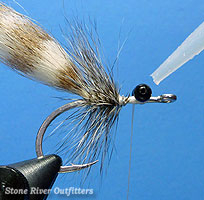 Step 7: Advance your thread forward to a comfortable position spaced slightly behind hook eye like shown, and attach a pair of Bead Chain Eyes securely using the figure-8 wrap method. Once tied in place and checked for level, apply a small drop of Zap-A-Gap or similar glue to help lock them in place.
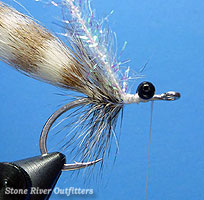 Step 8: Wrap your thread backward to where you previously tied off of the Grizzly hackles and affix a strand of Opal White Estaz measuring roughly 3 inches long. Once secured, advance your wraps forward again to until your thread rests in front of the Bead Chain Eyes.
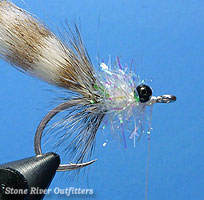 Step 9: Wrap the Estaz forward ensuring each new turn tightly abuts the previous, until the Bead Chain Eyes are reached. Pull the Estaz across the underside of the hook shank and tie it off snugly in front of the eyes, then trim the excess Estaz away.
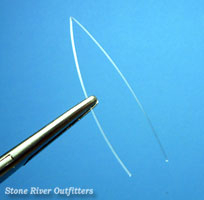 Step 10: Prepare a weed guard by cutting and straightening a 3 to 4 inch long piece of Mason Hard-Type Nylon (16lb or 20lb) or similarly stiff mono. Fold mono in half and pinch or crimp the apex into a tight U-shape as shown.
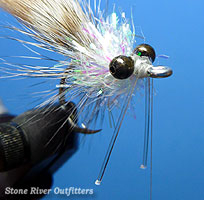 Step 11: Straddle the U-shaped mono on top of the hook shank, just in front of the bead chain eyes, then tie it securely into place using tightly drawn figure 8 wraps. Once reasonably secured, build a quick thread wall between the bead chain eyes and mono-legs using successive overlaying wraps, until the weed-guard 'props' perpendicularly to the hook shank at roughly a 90 degree angle. Quickly sight-check your weed guard by eying from the fly's front, and adjust weed guard with your fingers if necessary, ensuring the hook point is centered between the two mono-legs.
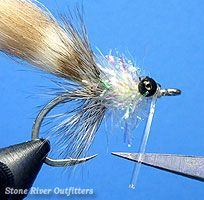 Step 12: Once your aim is squared, measure and trim the weed guard legs to proper proportion by gently bending them backwards toward the hook point, and cutting the mono about an 1/8 of an inch or so longer than (i.e. beyond) the hook point.
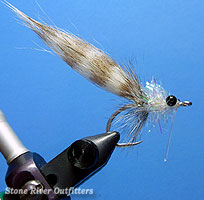 Step 13: Lastly, form a nice smooth head in front of the weed guard, whip-finish, and apply a thin layer of Epoxy to both the finished head and weed guard wraps.
Summary / Closing Remarks: There you have it folks! An exceptionally fun and easy-to-tie all-purpose saltwater pattern that's proven its worth not only in the warm coastal waters of Florida, but has also accounted for plenty of Striped Bass along our local New England shores as well, Dan's versatile Arctic Shrimp can be easily adapted by substituting your own favorite colors of Arctic Fox Tail, Neck Hackle and Estaz too! So friends, if you're looking for something salty to whip up this winter for the spring season ahead, be sure to give Dan's deadly Arctic Shrimp a spin! I promise you, the results won't disappoint! Have fun with this one gang. Thanks as always, for all your support. And please don't hesitate to call on us if we can be of further assistance! Sincerely - Nate Harris
