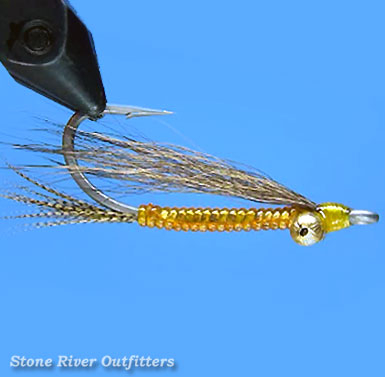
The Amber Shrimp
Hello friends, Nate Harris from Stone River Outfitters here, thanks for joining us! In this tutorial, I'll share how to tie a simple little flats pattern that has, over the years, proven exceptionally deadly for fooling BIG bonefish not only throughout the shallow waters of the Bahamian Out Islands, but along the dark muddy marls of the Florida Keys, and across Mexico's Yucatan Peninsula too. Originated by saltwater guru and innovative fly designer Mr. Doug Brewer, and known quite affectionately by we who fish it simply as the Brewer's Amber Shrimp, let's go ahead and get started!
Recipe / Materials List
- Hook: Mustad S71-34007 Sizes 02 - 08 (or similar)
- Thread: Yellow Danville's 210d Flymaster Plus
- Eyes: Gold Bead Chain (appropriately sized)
- Tail: Lemon Woodduck or Dyed Mallard Flank Substitute
- Body: Amber Vinyl Rib (aka V-Rib or D-Rib)
- Wing: Natural Brown Bucktail (from White Bucktail's backside)

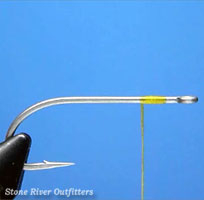 Step 1: We'll start the Amber Shrimp by installing a standard jam knot, placed comfortably behind our hook eye like shown.
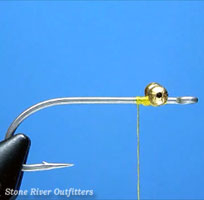 Step 2: To give our fly a little weight, we'll clip a single linked-pair of appropriately sized gold bead chain eyes, and we'll mount them snugly to the hook shank's top, positioned notably forward towards but not quite crowding our hook eye, using a series of well-placed, tight-wound figure-8 thread wraps.
***Special Notes: A final few snug drawn circular turns made with your bobbin around the bead chain's base will help choke your eyes firmly in place, and a quick drop Zap-a-Gap around your figure-8 thread wraps is well advised too!
 Step 3: Next, to create the Amber Shrimp's tail, we'll tie in along the hook shank's top, a nicely marked Lemon Woodduck feather. We will then bind the barbules and stem smoothly rearward, using evenly spaced turns, continuing until we've reached our stop located about a halfway between the hook's barb and the hook's sharpened point, like shown.
***Special Notes: For proportion's sake, I recommend taking a moment before binding, to briefly pre-measure your Woodduck against the hook, remembering that a well-dressed tail should roughly equal about 1 or so times the length of your shank!
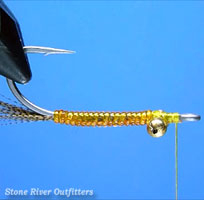
 Step 4: To create the Amber Shrimp's signature body, we'll next install at the fly's rear (with the half-round or D-shaped side facing down, against the hook shank), a comfortable 4 to 5 inch working length of Amber Vinyl-Rib.
Once affixed, we'll then bind the V-Rib forward with our thread, working smoothly along hook shank's top using nice, evenly spaced turns, continuing all the way forward to our bead chain eyes as shown.
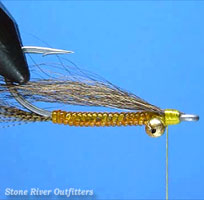
 Step 5: Next, we'll begin wrapping forward under notably heavy tension, and with the half-round or D-shaped side now facing out, our Amber Vinyl-Rib body. Moving smoothly along the hook shank using successive close-laid and tight-wound turns, we'll continuing wrapping our V-Rib all the way forward to, then quickly up-and-over our gold bead chain eyes. Once forward of them, we'll then tie off the V-Rib using a few well-placed, snug drawn thread wraps, and then trim away the excess V-Rib neatly at its base like.
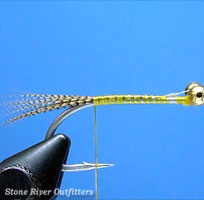
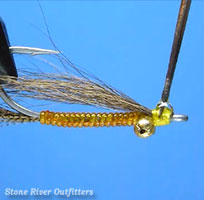
 Step 6: Next, in preparation for winging, we'll take a moment to invert our fly, orienting the Amber Shrimp as it will actually fish, with the bead chain eyes now on bottom and the hook point riding up!
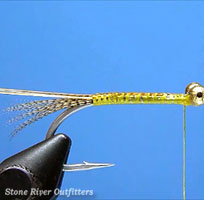
 Step 7: To create the Amber Shrimp's deadly dark colored wing, we'll snip from a white bucktail's backside-center, a nice sparse, semi-long bunch of fine-tipped Natural Brown hairs.
After roughly evening the clumps tapered tips by hand, and a quick tidy pre-trim of the hair's excess forward butt ends too, we'll next mount the wing firmly in place, just forward of our bead chain eyes and directly along the hook shank's top, using a few nice, neat, snug drawn thread wraps.
***Special Notes: Once again, for proportion's sake, I recommend taking a moment before mounting the wing, to briefly pre-measure your brown bucktail against the hook, ensuring your wing's end lines up apporimately flush and even with the tips of your woodduck tail!
 Step 8: Once satisfied with our wing's appearance, we'll next build ourselves a smooth wound, neatly tapered head of yellow thread. Then whip finish and trim.
Once whipped and snipped, we'll end this fly with a nice liberal bead of clear epoxy, or a heavy drop of high-quality thick-build head-cement drug neatly and evenly around both our yellow thread wraps entirety, and around the base of our bead chain eyes as well.
Summary / Closing Remarks: Well friends, there we have it! Doug Brewer's deadly Amber Shrimp tied start to finish, this simple, dark-toned, shallow-water flats pattern has proven irresistible to BIG bonefish and the occassional picky Permit throughout the Caribbean and beyond. A wise and worthwhile addition to your flat's fly box indeed. If you're headed south for a little fun in the tropical sun anytime soon, I strongly advise winding up a hefty handful of Brewer's trusty Amber Shrimp before leaving! As always, have fun with this one gang. Thanks so much for all your support, and please don't hesitate to call on us if we can be of further assistance! Sincerely - Nate Harris